[DataStructure] HashMap, HashTable과 ConcurrentHashMap 차이점
July 30, 2022
Map 인터페이스에 대한 내부구조 알아보기
약간의 사연이 있어서 😢
편리하게 사용하고 있는 Map관련 내부구조를 다시 보고 정리하면서 확인해 보려고 합니다
간단히 비교해 보기
| HashMap | HashTable | ConcurrentHashMap | |
|---|---|---|---|
| null able | ✔️ | ❌ | ❌ |
| thread-safe | ❌ | ✔️ | ✔️ |
| 사용 환경 | single-thread | ConcurrentHashMap을 사용 | multi-thread |
HashMap (해시맵)
Hash 알고리즘
먼저 key를 저장하는 hash와 관련된 내용부터 살펴 보겠습니다
//String.java의 JDK11 기준 -> jdk8부터는 큰 차이가 없습니다
public int hashCode() {
    int h = hash;
    if (h == 0 && value.length > 0) {
        hash = h = isLatin1() ? StringLatin1.hashCode(value)
                              : StringUTF16.hashCode(value);
    }
    return h;
}

//Lation1
public static int hashCode(byte[] value) {
    int h = 0;
    for (byte v : value) {
        h = 31 * h + (v & 0xff);
    }
    return h;
}

//UTF16
public static int hashCode(byte[] value) {
    int h = 0;
    int length = value.length >> 1;
    for (int i = 0; i < length; i++) {
        h = 31 * h + getChar(value, i);
    }
    return h;
}


//해시 보조
static final int hash(Object key) {
    int h;
    return (key == null) ? 0 : (h = key.hashCode()) ^ (h >>> 16);
}
기본적으로 key의 hashCode() 값을 기반으로 보조 해시함수로 비트연산자를 활용하여 계산합니다
hashCode()의 경우 char를 돌면서 31을 곱하면서 계산합니다
짝수를 곱할 경우 내부연산에서 곱을 왼쪽으로 이동하는 쉬프트 연산으로 계산하면서
overflow가 되고 0만 가득차게 될 수 있기 때문에 홀수와 소수인 31을 관행적으로 사용한다고 합니다
보조해시 함수를 test를 예를 들어 설명하겠습니다
- test의 hashCode()는 3556498이고 bit값은
1101100100010010010010입니다- bit연산으로 (h >>> 16)으로 앞의 6자리만을 남깁니다
110110- 1번과 2번의 값을 xor 연산하여 3556516을 도출합니다
1101100100010010100100
보는 것과 같이 hash 함수가 엄청 간단합니다
이렇게 간단하게 구현된 해시값이 겹치지 않을까요!? 👉 물론 겹칠 수 있습니다
이전에는 보다 복잡한 보조해시를 썼지만 hashCode() 자체의 알고리즘 개선과 효율성 측면에서 간단하게 계산합니다
법그래서 별도의 Separate Chaining(분리 연결법), Open Addressing(개방 주소)
으로 해시 충돌을 예방합니다
HashMap의 내부 구조
저장되는 데이터 구조를 살펴보겠습니다
transient Node<K,V>[] table;
static final float DEFAULT_LOAD_FACTOR = 0.75f;
static final int TREEIFY_THRESHOLD = 8;

static class Node<K,V> implements Map.Entry<K,V> {
    final int hash;
    final K key;
    V value;
    Node<K,V> next;

    ......

}

//Red-Black Tree
static final class TreeNode<K,V> extends LinkedHashMap.Entry<K,V> {
    TreeNode<K,V> parent;  // red-black tree links
    TreeNode<K,V> left;
    TreeNode<K,V> right;
    TreeNode<K,V> prev;    // needed to unlink next upon deletion
    boolean red;
    TreeNode(int hash, K key, V val, Node<K,V> next) {
        super(hash, key, val, next);
    }

    ......
}
저장 데이터 단위는 Node로 구성되어 있습니다
HashMap은 처음 생성될시에 기본적으로 16개의 Node를 저장할 수 있는 배열저장소를 내부에 생성합니다
이걸 Buckets이라고 부릅니다
HashMap의 내부 운영 방식
- Buckets 사이즈 조절
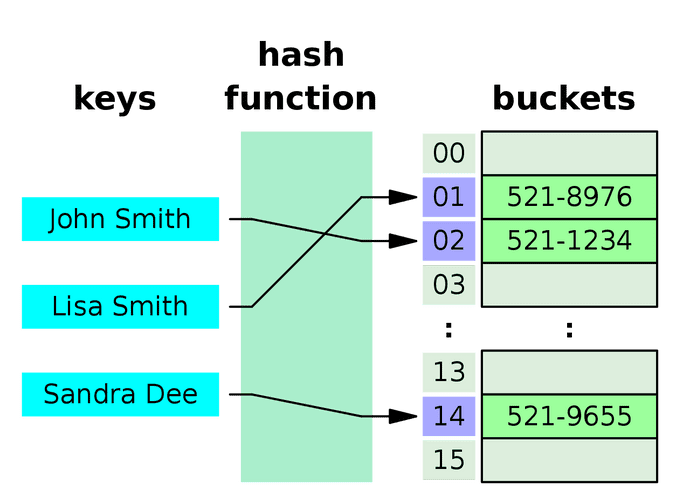
이전에 알아본 hash값을 기반으로(table.length - 1) & hashbuckets내의 자리를 찾고 그곳에 Node를 저장하게 됩니다
이후 16개의 DEFAULT_LOAD_FACTOR(75%)비율이 차게되면 buckets값을 2배 늘리고 값을 재분배하는 과정을 거칩니다
 Source : Hash Table Wiki
- Linked List
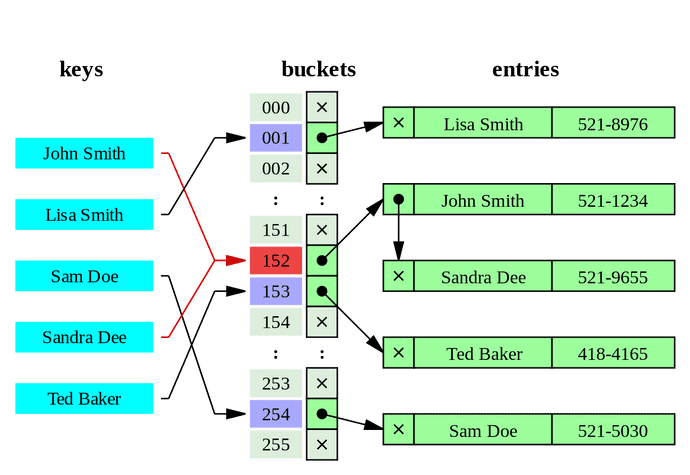
Node를 보시면Node<K,V> next를 보실 수 있습니다
key의 hash가 같은 Buckets 인덱스에 할당되면 key를 확인하고 다른 값이면 Linked List로 다음 Node로 해당 값을 저장합니다
이런 방식을 Separate Chaining(분리 연결법)이라고 합니다 👉 밑에서 자세히 살펴 보겠습니다
 Source : Hash Table Wiki
- Red-Black Tree
Linked List로 값을 저장하면 탐색 시간이 늘어나기 때문에 값이 늘어나면 효율적이지 않습니다
그래서 TREEIFY_THRESHOLD(8)로 연결이 늘어나게 되면 Node를treeifyBin()를 통해 TreeNode로 변경합니다
그리고 효율적인 레드블랙트리 알고리즘으로 저장합니다
👉 Red-Black Tree (레드블랙 트리) Wiki
다음으로 put의 코드를 살펴보겠습니다
final V putVal(int hash, K key, V value, boolean onlyIfAbsent,
                   boolean evict) {
        Node<K,V>[] tab; Node<K,V> p; int n, i;
  (1)   if ((tab = table) == null || (n = tab.length) == 0)              n = (tab = resize()).length;
  (2)   if ((p = tab[i = (n - 1) & hash]) == null)              tab[i] = newNode(hash, key, value, null);
  (3)   else {              Node<K,V> e; K k;
  (4)       if (p.hash == hash &&                ((k = p.key) == key || (key != null && key.equals(k))))                e = p;  (5)       else if (p instanceof TreeNode)                e = ((TreeNode<K,V>)p).putTreeVal(this, tab, hash, key, value);                  (6)       else {                for (int binCount = 0; ; ++binCount) {                    if ((e = p.next) == null) {
                        p.next = newNode(hash, key, value, null);
  (7)                   if (binCount >= TREEIFY_THRESHOLD - 1) // -1 for 1st                            treeifyBin(tab, hash);                        break;
                    }
                    if (e.hash == hash &&
                        ((k = e.key) == key || (key != null && key.equals(k))))
                        break;
                    p = e;
                }
            }
            if (e != null) { // existing mapping for key
                V oldValue = e.value;
                if (!onlyIfAbsent || oldValue == null)
                    e.value = value;
                afterNodeAccess(e);
                return oldValue;
            }
        }
        ++modCount;
 (8)    if (++size > threshold)            resize();        afterNodeInsertion(evict);
        return null;
    }
생각보다 put의 소스 자체가 복잡해 보입니다
여기서 주요 핵심부분을 8개로 나눠서 분류하고 하나씩 뜯어보겠습니다
(1) if ((tab = table) == null || (n = tab.length) == 0)
처음 등장하는 조건문입니다
buckets이 null 이거나 사이즈가 0인지를 체크하여 resize()를 통해 저장소를 생성합니다
(2) if ((p = tab[i = (n - 1) & hash]) == null)
hash의 buckets내의 index를 계산하고 null일 경우 Node를 바로 저장하는 조건문입니다
(3) else
hash의 buckets내의 index를 계산하고 null이 아닌 Node가 이미 들어 있는 경우입니다
(4), (5), (6)을 통해 put을 진행합니다
(4) if (p.hash == hash && ((k = p.key) == key || (key != null && key.equals(k))))
hash와 key의 값을 비교하여 같은 key의 value 변경인지를 확인합니다
같은 key로 확인되면 단순히 Node의 value값을 변경합니다
(5) else if (p instanceof TreeNode)
TreeNode 여부를 확인하여 Tree구조로 put을 진행합니다
(6) else { for (int binCount = 0; ; ++binCount)
Node의 Linked List를 탐색하며 put을 진행합니다
(7) if (binCount >= TREEIFY_THRESHOLD - 1) // -1 for 1st
(6)의 탐색을 진행하며 binCount가 너무 늘어나 탐색이 느려지는 기준점 TREEIFY_THRESHOLD(8)에
도달하게 된다면treeifyBin(tab, hash);를 통해서 Node를 TreeNode로 변경합니다
(8) if (++size > threshold)
마지막으로 buckets의 Node사이즈를 확인하여 resize() 여부를 결정합니다
이것으로 HashMap의 구조를 알아 봤습니다
단순히 저장해서 가져다가 쓰기만 했었는데 생각보다 내부에서는 다양한 알고리즘이 반영된걸 알 수 있었습니다
다음은 HashMap 이전에 존재했던 HashTable에 대해 알아보겠습니다
HashTable (해시테이블)
다음으로 알아볼 것은 HashMap 이전에 사용된 HashTable 입니다
그래서 기능적으로 많이 닮아 있으므로 다른 부분만을 빠르게 살펴 보겠습니다
hash 알고리즘
hash 알고리즘은 기존 HashMap과 달리 보조 해시 없이 기본 hashCode()를 그대로 사용합니다
int hash = key.hashCode();HashTable의 내부 구조
저장되는 데이터 구조를 살펴보겠습니다
private transient Entry<?,?>[] table;

public Hashtable() {this(11, 0.75f);}

private static class Entry<K,V> implements Map.Entry<K,V> {
     final int hash;
     final K key;
     V value;
     Entry<K,V> next;

     ...
}
저장 데이터 단위는 Entry로 구성되어 있습니다
HashTable은 11개 사이즈의 Buckets을 생성합니다
HashTable의 내부 운영 방식
- Buckets 사이즈 조절
HashMap과 동일하게 전체의 75%가 차게되면 사이즈를 조정합니다
int newCapacity = (oldCapacity << 1) + 1;쉬프트 연산을 통해 기존 사이즈의 두배 +1 의 값으로 재설정 됩니다
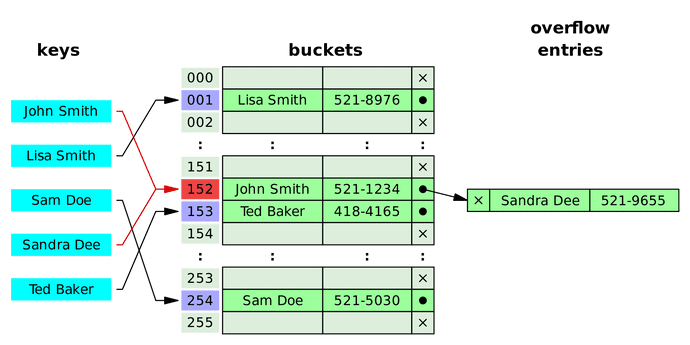
 Source : Hash Table Wiki
- Linked List
Entry도 Node와 같이 Linked List구조로Entry<K,V> next를 가지고 있는걸 보실 수 있습니다
HashMap과 동일하게 충돌방지로 Separate Chaining(분리 연결법)을 사용하는걸 알 수 있습니다
 Source : Hash Table Wiki
HashTable은 Liked List의 사이즈의 대해서 효율성을 위해 Tree로 바꾼다거나 하는 로직은 찾아 볼 수 없습니다
다음으로 put의 코드를 살펴보겠습니다
(1) public synchronized V put(K key, V value) {
        // Make sure the value is not null
(2)     if (value == null) {            throw new NullPointerException();        }
        // Makes sure the key is not already in the hashtable.
        Entry<?,?> tab[] = table;
(3)     int hash = key.hashCode();          int index = (hash & 0x7FFFFFFF) % tab.length;
        @SuppressWarnings("unchecked")
        Entry<K,V> entry = (Entry<K,V>)tab[index];

        for(; entry != null ; entry = entry.next) {            if ((entry.hash == hash) && entry.key.equals(key)) {                V old = entry.value;
                entry.value = value;
                return old;
            }
        }

(5)     addEntry(hash, key, value, index);          return null;
}


private void addEntry(int hash, K key, V value, int index) {
        Entry<?,?> tab[] = table;

(6)     if (count >= threshold) {            // Rehash the table if the threshold is exceeded            rehash();
            tab = table;
            hash = key.hashCode();
            index = (hash & 0x7FFFFFFF) % tab.length;
        }

        // Creates the new entry.
        @SuppressWarnings("unchecked")
        Entry<K,V> e = (Entry<K,V>) tab[index];
        tab[index] = new Entry<>(hash, key, value, e);
        count++;
        modCount++;
}
HashMap과 다르게 간단한 put 구조를 가지고 있습니다
(1) public synchronized V put(K key, V value)
synchronized를 통해 thread-safe하게 설계된걸 확인 할 수 있습니다
이후 HashMap에서는 사용상에 thread-safe 구성이 효율적이지 않다고 삭제되었습니다
(2) if (value == null) { throw new NullPointerException(); }
HashMap과 다르게 value에 null을 허용하지 않습니다
(3) int hash = key.hashCode();
key값도 보조해시 없이 그냥 hashCode()를 사용합니다
때문제 key에서도 null이 허용되지 않습니다 (HashMap에서는 보조해시에서 null일 경우 0을 할당합니다)
(4) for(; entry != null ; entry = entry.next)
Entry를 탐색하며 값변경만을 적용합니다
(5) addEntry(hash, key, value, index);
addEntry를 통해 신규 Entry를 buckets에 삽입합니다
(6) if (count >= threshold)
buckets의 Entry사이즈를 확인하여 rehash() 여부를 결정합니다
ConcurrentHashMap(병행해시맵)
다음으로 알아볼 것은 ConcurrentHashMap 입니다
ConcurrentHashMap의 핵심은 Unsafe를 사용한 thread-safe를 지원한다는 것입니다
Unsafe는 java 내부의 존재하는 thread-safe를 위해 존재하는 class입니다
내부적으로 AutoInteger, ConcurrentHashMap등의 thread-safe에 사용되며 일반적으로는 생성해서 사용하지 못하도록
private static final Unsafe theUnsafe = new Unsafe();로 생성자를 막아 두었습니다
해당 포스트에서는 다루지 않습니다 👉 java-unsafe
private static final Unsafe U = Unsafe.getUnsafe();

 static {
     ......

     ABASE = U.arrayBaseOffset(Node[].class);
     int scale = U.arrayIndexScale(Node[].class);
     ASHIFT = 31 - Integer.numberOfLeadingZeros(scale);

     ......
}

static final <K,V> Node<K,V> tabAt(Node<K,V>[] tab, int i) {
  return (Node<K,V>)U.getObjectAcquire(tab, ((long)i << ASHIFT) + ABASE);
}

static final <K,V> boolean casTabAt(Node<K,V>[] tab, int i,
                                  Node<K,V> c, Node<K,V> v) {
  return U.compareAndSetObject(tab, ((long)i << ASHIFT) + ABASE, c, v);
}
ConcurrentHashMap는 내부의 thread-safe를 위해 조회와 삽입을 하는 메소드가 구현되어 있습니다
tabAt는 thread-safe하게 조회를 하고 casTabAt는 thread-safe하게 삽입시 성공여부에 따라 true, false를 return 합니다
해당 메소드들을 통해 알 수 있듯이 HashTable과 다르게 각각의 Node의 대한 thread-safe 기술을 활용하여
HashMap의 thread-safe가 안되는 문제를 효율적으로 제어하였습니다
다음으로 put의 코드를 살펴보겠습니다
 static final int MOVED     = -1; // hash for forwarding nodes

 //보조 해시
 static final int spread(int h) {
     return (h ^ (h >>> 16)) & HASH_BITS;
 }

 //resize를 위한 Node
  static final class ForwardingNode<K,V> extends Node<K,V> {
     final Node<K,V>[] nextTable;
     ForwardingNode(Node<K,V>[] tab) {
         super(MOVED, null, null);
         this.nextTable = tab;
     }

     ......
  }


final V putVal(K key, V value, boolean onlyIfAbsent) {
 (1)    if (key == null || value == null) throw new NullPointerException();  (2)    int hash = spread(key.hashCode());         int binCount = 0;
 (3)    for (Node<K,V>[] tab = table;;) {             Node<K,V> f; int n, i, fh; K fk; V fv;

            if (tab == null || (n = tab.length) == 0)                tab = initTable();
            else if ((f = tabAt(tab, i = (n - 1) & hash)) == null) {                if (casTabAt(tab, i, null, new Node<K,V>(hash, key, value)))                    break;                   // no lock when adding to empty bin            }

            else if ((fh = f.hash) == MOVED)                tab = helpTransfer(tab, f);            else if (onlyIfAbsent // check first node without acquiring lock
                     && fh == hash
                     && ((fk = f.key) == key || (fk != null && key.equals(fk)))
                     && (fv = f.val) != null)
                return fv;
            else {
                V oldVal = null;
 (7)           synchronized (f) {                     if (tabAt(tab, i) == f) {
                        if (fh >= 0) {
                            binCount = 1;
                            for (Node<K,V> e = f;; ++binCount) {
                                K ek;
                                if (e.hash == hash &&
                                    ((ek = e.key) == key ||
                                     (ek != null && key.equals(ek)))) {
                                    oldVal = e.val;
                                    if (!onlyIfAbsent)
                                        e.val = value;
                                    break;
                                }
                                Node<K,V> pred = e;
                                if ((e = e.next) == null) {
                                    pred.next = new Node<K,V>(hash, key, value);
                                    break;
                                }
                            }
                        }
                        else if (f instanceof TreeBin) {
                            Node<K,V> p;
                            binCount = 2;
                            if ((p = ((TreeBin<K,V>)f).putTreeVal(hash, key,
                                                           value)) != null) {
                                oldVal = p.val;
                                if (!onlyIfAbsent)
                                    p.val = value;
                            }
                        }
                        else if (f instanceof ReservationNode)
                            throw new IllegalStateException("Recursive update");
                    }
                }
                if (binCount != 0) {
                    if (binCount >= TREEIFY_THRESHOLD)
                        treeifyBin(tab, i);
                    if (oldVal != null)
                        return oldVal;
                    break;
                }
            }
        }
 (8)    addCount(1L, binCount);         return null;
    }
(1) if (key == null || value == null) throw new NullPointerException();
HashMap과 다르게 null을 허용하지 않습니다
(2) int hash = spread(key.hashCode());
spread()는 보조해시 함수로 이전에 본 HashMap과 크게 다르지 않습니다
(3) for (Node<K,V>[] tab = table;;)
ConcurrentHashMap는 값 삽입시 thread끼리 충돌이 날수 있기 때문에 재시도를 위해 for문으로 시작됩니다
(4) if (tab == null || (n = tab.length) == 0)
buckets의 초기 세팅이 필요한경우 buckets을 생성합니다
HashMap과 똑같인 DEFAULT_CAPACITY = 16의 LOAD_FACTOR = 0.75f을 기본값으로 가집니다
(5) else if ((f = tabAt(tab, i = (n - 1) & hash)) == null)
tabAt을 통해 Node가 처음 삽입되는 값인지 확인합니다
casTabAt통해 값을 삽입하며 삽입시점에 buckets의 값이 null인지 확인하여 성공시 true, 실패시 false를 리턴합니다
삽입에 실패하면 (3) for문으로 돌아가 재시도 합니다
(6) else if ((fh = f.hash) == MOVED)
hash값이 MOVED(-1)인지를 검사합니다(ForwardingNode의 hash값)
helpTransfer()를 실행하여 리사이즈를 진행합니다
(7) synchronized (f)
탐색시에 synchronized를 사용하여 해당 Node의 LinkedList, Tree의 대한 thread-safe를 보장합니다
(8) addCount(1L, binCount);
size를 측정하여 transfer로 리사이즈를 진행하고 ForwardingNode을 할당합니다
Hash Collision(해시 충돌)
다음은 해시들의 충돌을 해결하는 방법을 2가지 제시합니다
Separate Chaining(분리 연결법)
가장 널리 사용되고 있는 분리 연결법입니다

Source : Hash Table Wiki
새로 값을 삽입할때 해시의 buckets의 같은 공간에 이미 값이 존재하고
해당 key와 value의 값이 삽입되야하는 값과 다르다면 값을 저장하는 모델(Node)을 만들고
Linked List, Tree등의 자료구조를 사용하여 연결하여 삽입하는 방법입니다
Open Addressing(개방 주소법)
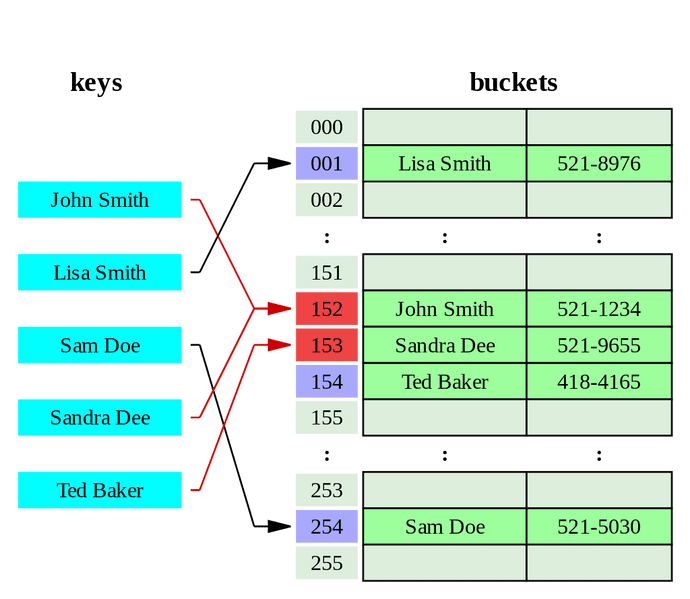
개방 주소법은 buckets을 그대로 사용합니다

Source : Hash Table Wiki
해시의 buckets의 같은 공간에 이미 값이 존재한다면 새로운 주소로 buckets에 값을 할당하는 방식입니다
새로운 주소를 구하는 방법은 여러 방식이 존재합니다
- 고정폭을 가지고 삽입하고 값을 이동시킨다
- 처음엔 1만큰 이후에 2^2, 3^2 만큼 옮기는 방식
- 해시값을 한번더 해싱하여 새로운 주소로 값을 삽입합니다
서로의 방식에는 장단점이 있습니다
Separate Chaining의 경우 buckets자체의 확장이 필요없고 삽입과 삭제가 손쉽게 가능합니다
단점으로는 List 및 Tree의 길이가 늘어날수록 탐색의 효율이 떨어지게 됩니다
Open Addressing이 추가 메모리 할당 없이 buckets자체를 사용하게 됩니다
단점으로 삽입과 탐색시 효율이 떨어지며 삭제시 빈공간의 대한 buckets 재정리 작업이 필요합니다
마무리
HashTable의 충돌발생시 해결법을 알고 있느냐는 질문을 받았습니다
그때 당시 Separate Chaining(분리 연결법)의 방법을 알고 있었지만,
충돌자체를 thread-safe여부로 받아들여 HashTable은 충돌이 발생하지 않는 걸로 알고 있다고 답해버렸습니다 😭
이를 계기로 명확하게 구조를 보고 정리하는 시간을 갖게 되었습니다 👋
관련 참고
Hash table 위키
네이버 D2 포스팅
망나니개발자님 블로그
alsgus92.log
겐지충프로그래머님 블로그