[Spring] Spring의 Scope와 ProxyMode 알아보기
December 20, 2019
Spring Scope
Spring Bean을 생성시 적용되는 Scope에 대해 알아보려 합니다 아래 모든 소스의 제 Github에서 확인 하실 수 있습니다
해당 포스팅은 내부적 구현 요소의 대해 설명에 집중하며 Scope의 일반적인 사용법을 보시려면 👉 baeldung - spring-bean-scopes
Spring Bean의 Scope는 크게 2가지가 존재합니다
Spring의 내부 ConfigurableBeanFactory를 보면 singleton과 prototype 2가지 속성을 나타내고 있습니다
public interface ConfigurableBeanFactory extends HierarchicalBeanFactory, SingletonBeanRegistry {

	/**
	 * Scope identifier for the standard singleton scope: "singleton".
	 * Custom scopes can be added via {@code registerScope}.
	 * @see #registerScope
	 */
	String SCOPE_SINGLETON = "singleton";

	/**
	 * Scope identifier for the standard prototype scope: "prototype".
	 * Custom scopes can be added via {@code registerScope}.
	 * @see #registerScope
	 */
	String SCOPE_PROTOTYPE = "prototype";
...
}
일반적으로 생성되는 빈들은 모두 Singleton으로 생성되게 됩니다
즉 아래 두개의 Bean들은 서로 동일하게 Singleton으로 생성되게 됩니다
@Component
public class Single {}


@Component
@Scope("singleton")
public class Single {}Singleton으로 생성하게 되면 어디서나 1개의 인스턴스를 참조하여 사용하게 됩니다
@Component
public class Single {}
예를 들어 다음 같이 Singleton Bean을 하나 만들고
@Component
@AllArgsConstructor
public class ScopeWrapper {

    @Getter
    Single single;

    ...
}
WrapperClass를 하나 만들어서 해당 Bean을 Autowired DI 해줍니다
@Slf4j
@Service
@AllArgsConstructor
public class ScopeService {
    private final ScopeWrapper scopeWrapper;
    private final Single single;

    public void scopeTest() {
        log.info("[============== Singleton Bean ==============]");
        log.info("Scope Service Single : " + single);
        log.info("Scope Wrapper Single : " + scopeWrapper.getSingle());
    }
}
그 후 ScopeService 만들어서 각각의 Bean을 DI하고 각각의 Single 인스턴스를 출력하면 다음과 같습니다

Singleton으로 당연하게 같은 Instance를 확인 할 수 있습니다
Prototype은 매번 새로운 Instance를 생성하여 Bean의 생명주기가 필요할 때 사용되게 됩니다
@Component
@Scope("prototype")
public class Proto {}
Prototype Bean을 하나 생성하고
@Component
@AllArgsConstructor
public class ScopeWrapper {

    @Getter
    Proto proto;
    ...
}
아까와 같이 WrapperClass에 Propotype Bean을 DI해줍니다
@Slf4j
@Service
@AllArgsConstructor
public class ScopeService {
    private final ScopeWrapper scopeWrapper;
    private final Proto proto;

    public void scopeTest() {
        log.info("[============== Prototype Bean ==============]");
        log.info("Scope Service Proto : " + proto);
        log.info("Scope Wrapper Proto : " + scopeWrapper.getProto());
    }
}
ScopeService 아까와 같이 구성해서 출력하면 다음과 같습니다

Prototype으로 서로 다른 Instance를 확인 할 수 있습니다
@Slf4j
@Service
@AllArgsConstructor
public class ScopeService {

    private final ApplicationContext ctx;

    public void scopeTest() {
        log.info("[============== Prototype getBean ==============]");
        log.info("getBean Case 1 : " + ctx.getBean("proto"));
        log.info("getBean Case 2 : " + ctx.getBean("proto"));
    }
}

ApplicationContext를 통해 getBean으로 Proto를 가져와도 다른 Instance를 가져오는 것을 확인 할 수 있습니다
위에 예제들을 통해 Singleton과 Prototype의 특성을 살펴 보았습니다
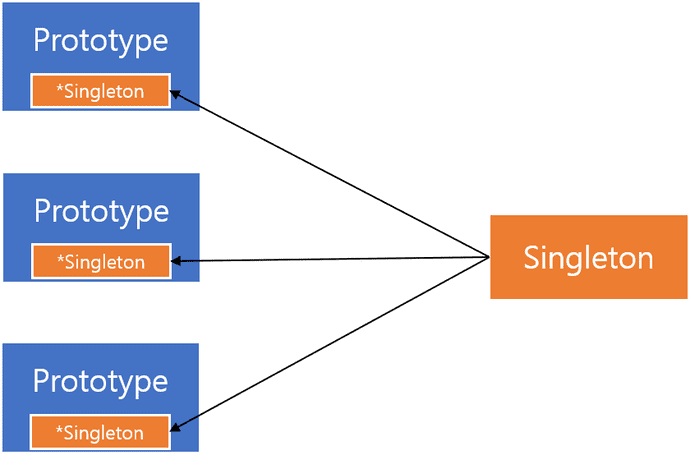
이 스코프 특성들은 각각 사용하거나 Prototype에서 Singleton을 가지고 사용하는 것에는 문제가 없습니다

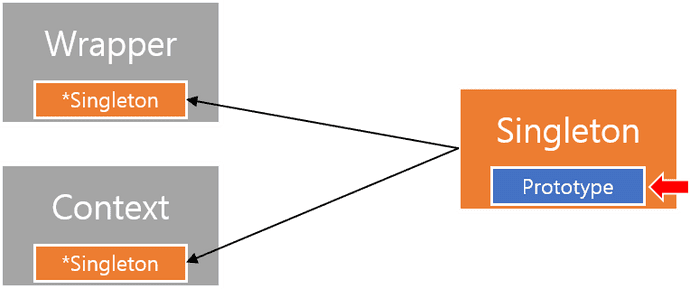
반대로 Singleton에서 Prototype을 가지고 있는 경우에는 의도한 것과 다른 결과를 낼 수 있습니다

이미 Singleton으로 생성되는 시점에 Prototype이 생성되어 들어 오기 때문에
Singleton 내부의 Prototype을 호출해게 되면 매번 같은 값을 가져오게 됩니다
@Slf4j
@Service
@AllArgsConstructor
public class ScopeService {

    private final ApplicationContext ctx;

    public void scopeTest() {
        log.info("[============== Singleton getBean And getPrototype ==============]");
        log.info("ScopeWrapper getBean Proto Case 1 : " + ctx.getBean(ScopeWrapper.class).getProto());
        log.info("ScopeWrapper getBean Proto Case 2 : " + ctx.getBean(ScopeWrapper.class).getProto());
    }
}

다음과 같이 같은 Instance가 return 된걸 확인 할 수 있습니다
그럼 원래 처럼 매번 다른 Instance를 받아 오려면 어떻게 해야 할까요?
이러한 문제를 해결하기 위해 Spring에서는 ProxyMode를 제시하고 있습니다
@Component
@Scope(value = "prototype", proxyMode = ScopedProxyMode.TARGET_CLASS)
public class ProtoProxy {}


@Component
@AllArgsConstructor
public class ScopeWrapper {
    ...

    @Getter
    ProtoProxy protoProxy;
}
위와 같이 Prototype에 ProxyMode를 추가 하고 Wrapper에 DI 후 출력해 봅니다
@Slf4j
@Service
@AllArgsConstructor
public class ScopeService {

    private final ApplicationContext ctx;

    public void scopeTest() {
        log.info("[============== Singleton getBean And getProxyPrototype ==============]");
        log.info("ScopeWrapper getBean Proxy Proto Case 1 : " + ctx.getBean(ScopeWrapper.class).getProtoProxy());
        log.info("ScopeWrapper getBean Proxy Proto Case 2 : " + ctx.getBean(ScopeWrapper.class).getProtoProxy());
    }
}

ProxyMode로 우회해서 다음과 같이 원하는 값을 얻어 낼 수 있었습니다
참고로 request or session과 같은 scope도 이런 ProxyMode를 구현되어 있습니다
@Target({ElementType.TYPE, ElementType.METHOD})
@Retention(RetentionPolicy.RUNTIME)
@Documented
@Scope(WebApplicationContext.SCOPE_SESSION)
public @interface SessionScope {

	/**
	 * Alias for {@link Scope#proxyMode}.
	 * <p>Defaults to {@link ScopedProxyMode#TARGET_CLASS}.
	 */
	@AliasFor(annotation = Scope.class)
	ScopedProxyMode proxyMode() default ScopedProxyMode.TARGET_CLASS;
}@Target({ElementType.TYPE, ElementType.METHOD})
@Retention(RetentionPolicy.RUNTIME)
@Documented
@Scope(WebApplicationContext.SCOPE_REQUEST)
public @interface RequestScope {
/**
* Alias for {@link Scope#proxyMode}.
* <p>Defaults to {@link ScopedProxyMode#TARGET_CLASS}.
*/
@AliasFor(annotation = Scope.class)
ScopedProxyMode proxyMode() default ScopedProxyMode.TARGET_CLASS;
}다음은 마지막으로 Interface와 ProxyMode를 통한 Bean 생성시 유의해야할 사항에 대해 알아 보겠습니다
public interface ProtoInterface {}

public class ProtoInterfaceImpl implements ProtoInterface {
    @Getter
    String name;

    public ProtoInterfaceImpl() {}

    public ProtoInterfaceImpl(String name) {
        this.name = name;
    }
}Interface를 생성하고 구현체인 ProfoInterfaceImpl을 생성하였습니다
@Configuration
public class ProtoInterFaceBean {

    @Bean(name = "ProtoInterfaceProxy")
    @Scope(value = "prototype", proxyMode = ScopedProxyMode.TARGET_CLASS)
    public ProtoInterface getProtoInterfaceProxyBean() {
        return new ProtoInterfaceImpl();
    }

    @Bean(name = "ProtoInterface")
    @Scope(value = "prototype")
    public ProtoInterface getProtoInterfaceBean() {
        return new ProtoInterfaceImpl();
    }
}
그리고 다음과 같이 각각 일반 Prototype Bean 한개와 ProxyMode의 Bean을 생성합니다
Bean에서는 return은 Interface로 하지만 실제적으론 구현체인 ProtoInterfaceImpl을 생성하여 return 하였습니다
@Slf4j
@Service
public class ScopeService {

    @Autowired
    @Qualifier("ProtoInterface")
    private  ProtoInterface protoInterface;

    @Autowired
    @Qualifier("ProtoInterfaceProxy")
    private  ProtoInterface protoInterfaceProxy;

    public void scopeTest() {
                log.info("[============== ProtoInterfaceImpl Prototype Bean Return ProtoInterface ==============]");
                log.info("Bean Is ProtoInterface Instranceof : " + (protoInterface instanceof ProtoInterface));
                log.info("Bean Is ProtoInterfaceImpl Instranceof : " + (protoInterface instanceof ProtoInterfaceImpl));
                System.out.println();

                log.info("[============== ProtoInterfaceImpl Prototype Proxy Bean Return ProtoInterface ==============]");
                log.info("Proxy Bean Is ProtoInterface Instranceof : " + (protoInterfaceProxy instanceof ProtoInterface));
                log.info("Proxy Bean Is ProtoInterfaceImpl Instranceof : " + (protoInterfaceProxy instanceof ProtoInterfaceImpl));
                System.out.println();
    }
}
그 다음 다음과 같이 각각의 Bean을 DI 받아서 instanceof로 확인하면 어떻게 될까요?

일반적으로 생성된 Bean의 경우 당연하게도 interface와 구현체 모두 true로 확인이 가능합니다

하지만 Proxy의 한번 경유하는 특성으로 Return Type과 같은 interface에서만 true로 나온 것을 확인할 수 있습니다
이러한 문제로 ProxyMode가 걸린 Bean의 경우 주의가 필요합니다
@Configuration
public class ProtoInterFaceBean {
    ...

    @Bean(name = "ProtoInterfaceProxySafe")
    @Scope(value = "prototype")
    public ProtoInterfaceImpl getProtoInterfaceProxySafeBean() {
        return new ProtoInterfaceImpl("Safe Bean");
    }
}
다음과 같이 간단하게 Return Type을 맞춰 주는 것으로 해결 할 수 있습니다

이것으로 Bean의 생명주기 Scope의 대한 포스팅을 마무리 합니다

Scope와 관련해서 이것저것 애매한 사항이 많았는데
이렇게 한번 정리하면서 소스를 짜고 보니 맘속까지 후련해 졌습니다
이 포스팅이 저와 같은 궁금증을 가지신 분들에서 도움이 되길 바립니다